One of the most important strategies in Othello is what the Japanese call even number theory; others refer to it as parity. Before examining this theory, we need to define the term region. As the name implies, a region refers to an empty area of the board, usually (although not always) including a corner, separate from other empty squares. In Diagram 8-1, the board has been broken up into four separate regions: 3 squares in the upper left, 8 squares in the upper right, 3 squares in the lower right, and 7 squares in the lower left.
The basic idea behind parity is that, when there is a region with an even number of squares left to be filled, it is usually better to play into the region last. That is, you want your opponent to play into the region first, after which you follow, hopefully flipping back some of the pieces that your opponent just captured. In Diagram 8-2, it might appear obvious that Black would want to move first, taking the h1 corner and saving the adjacent four black discs. White would then take the last move at g1, leaving Black with 37 discs (Diagram 8-3).
Now suppose that it is White to move first in Diagram 8-2. White has no choice but to play h1 (Diagram 8-4). Black takes the last move at g1 (Diagram 8-5). As shown in Diagram 8-5, this leaves Black with 38 discs, one more than in Diagram 8- 3! Perhaps you are wondering “what is the big deal about one disc”? The point is that even when it looked like Black wanted to go first, in fact he was better off going second. In many positions, such as Diagram 8-6, the difference between playing first and playing second is the difference between winning and losing.
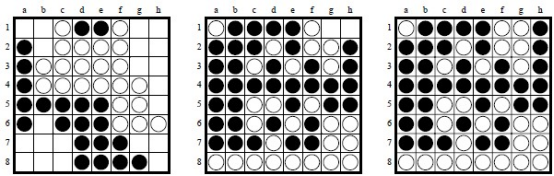
Diagram 8-1 Diagram 8-2 Diagram 8-3
White to move Black H1, White G1
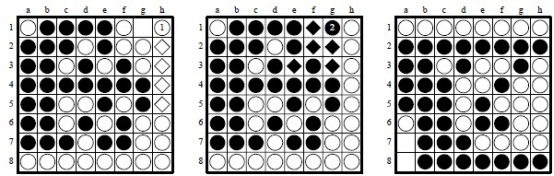
Diagram 8-4 Diagram 8-5 Diagram 8-6
White H1 Black G1
Diagram 8-7 shows an example of even number theory with four squares left. Suppose that it is Black’s turn to move (Diagram 8-8). Black has no choice but to play b2, after which White takes the a1 corner. Now there are two squares left; naturally Black must play first, giving White a good final move and a 33-31 victory. On the other hand, if it were White’s turn in Diagram 8-7, then after the sequence shown in Diagram 8-9, Black wins 37-27. As these examples suggest, the impact of even number theory is often greater for a 4-square region than for a 2-square region.
While in the examples above we have only looked at the final moves, in an actual game, once there are only two squares left, it is too late to start worrying about whether you want to go first or second. After all, that is something you do not get to choose! The real power behind even number theory is that earlier in the game, sometimes much earlier, it may be possible to play in such a way that you are guaranteed to get the last move in most or all of the regions. Since there are very often several regions on the board, the cumulative advantage of getting the last move in each of them can add up to be worth many discs.
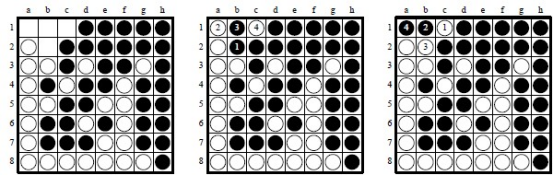
Diagram 8-7 Diagram 8-8 Diagram 8-9
Black first White first
In fact, it is often worth sacrificing one, two, or even all four corners if it ensures that you can play last in every region. Diagram 8-10 shows a position from the 2001 World Championship finals. White appears to be in considerable trouble. He has already conceded the a8 corner, and what is worse, has no safe moves available. Since it is White’s turn, this means that he will have to give up yet another corner. Despite all this, even number theory actually gives White a slight advantage in the game! The main feature to notice in this position is that all four regions of the board have an even number of squares, except for the lower-right hand corner, which has three squares.
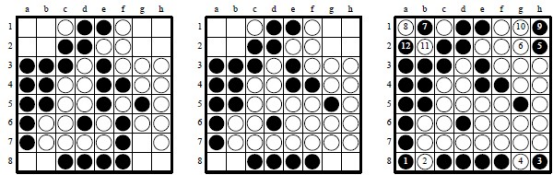
Diagram 8-10 Diagram 8-11 Diagram 8-12
White to move Black to move Perfect play
White should begin by playing into the odd-numbered region, i.e., either g7 or g8. In this case, g7 is considerably better, since it allows White to keep the bottom edge at the end of the game (if this is not clear to you, try playing g8 in Diagram 8-10, then use the sequence in Diagram 8-12, except for playing move 4 at g7 instead of g8). The resulting position is shown in Diagram 8-11. Note how all of the regions now contain an even number of squares. Unfortunately for Black, he will (with one exception) have to initiate play into even regions for the rest of the game. Meanwhile, finding the right moves for White is easy: whenever Black plays into a region, simply follow him by playing in the same region.
Diagram 8-12 shows perfect play for both sides (I strongly urge you to play this sequence out on a board). Note how Black is always playing into an even-numbered region, creating an odd-numbered region for White. White gets the last move in each region except for the final two squares, when Black passes and forces White to initiate play. Still, the advantage of playing into an odd-numbered region on six of his last seven moves allows White to eke out a 33-31 victory. In this case, we say that White won by using even number theory, or that White had parity, that is, White got the last move in every (or almost every) region.
Thus far we have looked at even-number theory only in the endgame, but it can also help find the right move earlier in the game. Consider the starting position, before the first move is made. The board has 64 squares, and four squares are occupied, so that there are 60 empty squares in this position. In some sense, all 60 empty squares on the board can be viewed as one large even-numbered region. On the first move of the game, Black moves into an even-numbered region, on the second move, White moves into an odd-numbered region (59 empty), and so on. Thus, from the beginning of the game, even-number theory is working in favor of White. If the game proceeds without any passes, then White will get the last move of the game on move 60.
As noted earlier, in Diagram 8-6, whichever side plays first will lose. Even number theory tells us that if no passes occurred during the game, then it must now be Black’s turn, because there are an even number of empty squares. The only way it could be White’s turn would be if there was one pass (or some odd number of passes). Similarly, in Diagram 8-11, it is not merely a coincidence that it is Black’s turn to move.
While the above examples might make it appear that White starts the game with a big advantage, there are ways for Black to make even number theory work in his favor. For example, Diagram 8-13 shows a position from a game played at the 1982 World Championship. Black was played by Kunihito Tanida from Japan, who went on to win the tournament. Up until this point there were no passes, and there are an even number of empty squares, so it must be Black’s turn. Note, however, that instead of even-numbered regions, there are two odd-numbered regions: three squares in the upper left corner, and one square at e1. Further, note that White can not move to e1. This allows Black to win by playing b1 (Diagram 8-14)! According to even number theory, White should play into the odd region, i.e., e1, but in this case White does not have access, and must play into the even region. White can play a1, but Black gets the last move in the region by playing b2, leaving the position in Diagram 8-15.
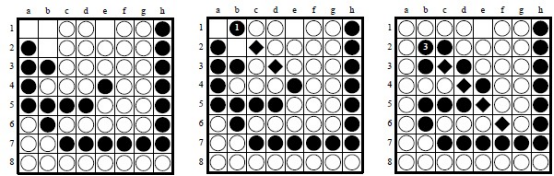
Diagram 8-13 Diagram 8-14 Diagram 8-15
Black to move White to move White passes
White still does not have access to e1 and must pass. Black finishes the game by playing e1 himself, squeezing out a 33-31 victory (Diagram 8-16). Since Black got the last move in each region, we say that Black used anti-even number theory, or that Black had parity.
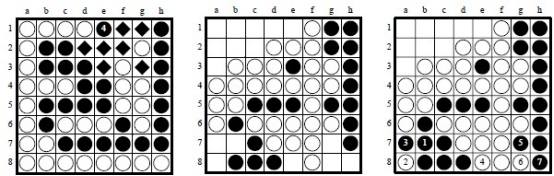
Diagram 8-16 Diagram 8-17 Diagram 8-18
Black wins Black to move White passes
Again, the key feature of Diagram 8-13 which allows Black to win is that White does not have access to an odd-numbered (in this case one square, e1) region. Since the total number of squares is even, the number of squares in the rest of the board must be odd as well (in this case three squares, a1, b1 and b2). If Black can keep play contained in the rest of the board, even-number theory is working in his favor. Black will take the last move in the rest of the board, and then White will pass. Finally, black will initiate play in the odd-numbered region which White does not have access to. Since it is odd-numbered region, the player moving first, Black, will get the last move in this region as well.
Diagram 8-17 shows another example of the same principle, but with 16 empty squares rather than four. Here, white is walled off from the upper-left region of the board, which contains nine empty squares. While there are many ways for Black to win, the simplest strategy is to use even number theory. This tells us that Black should leave the upper-left region untouched, filling in the rest of the board first. One possible sequence is shown in Diagram 8-18. Note how Black gets the last move because, excluding the upper-left region, there are an odd number of empty squares (seven in this case). White passes, and then Black can initiate play into the upper-left region, with e1 being the obvious place to start. Since the upper-left region is oddnumbered, Black will get the last move here as well, winning easily.
As these examples demonstrate, it can be dangerous for White to wall himself off from an odd-numbered region. However, it would not be true to say that White should always avoid creating odd-numbered regions. Diagram 8-19 shows a position which has been reached many times in expert play. Here, White’s best strategy is to leave Black’s long wall untouched, and play to the top edge at c1 (Diagram 8-20) or d1 (Diagram 8-21). Even number theory suggests that d1 would be better than c1, since c1 creates a three square region in the upper left corner that White can not play into, while d1 would leave a four square region. However, player experience and computer analysis tells us that c1 is actually slightly better than d1.
Considering only how the top edge will play out, most experts would agree that c1 is the best move. In this case, that advantage seems to be enough to overcome the awkward position created in the upper-left corner. Always keep in mind that the basic strategy of Othello is to run the opponent out of moves. In Diagram 8-20, if White can eventually run Black out moves, Black may very well be forced to move into the upper-left corner sooner than he wants, and once again even number theory will work in favor of White.
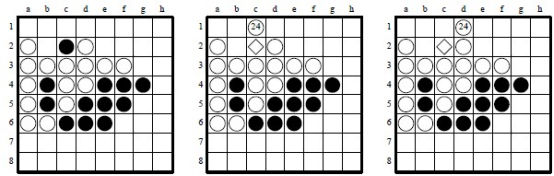 Diagram 8-19 Diagram 8-20 Diagram 8-21
White to move Black to move Black to move
Hyper even number theory
Even number theory tells us that it is usually a disadvantage to initiate play into an even-numbered region. One way to ensure that you will not have to play into an even-numbered region is to have no legal moves in that region! Even if you run completely out of moves in the rest of the board, you will simply pass, and your opponent will still have to initiate play into the region. In Japanese, this is called hyper even number theory, or just hyper for short.
In Diagram 8-22, Black must play to either a1 or b1. In either case, White captures most of the top edge and wins the game. Diagram 8-23 shows the same position, except that the disc on b2 has been made black. In this case, Black does not have a legal move and passes. This forces White to initiate play into the region, and now it is Black that gets to keep most of the top edge, winning the game. This difference is the basic idea behind hyper even number theory.
Diagram 8-22 Diagram 8-23 Diagram 8-24
Black to move Black passes Black to move
Diagram 8-24 shows one common way that Black can set up a position which takes advantage of hyper even number theory. Here, Black should begin with h8, as shown in Diagram 8-25. If White does not wedge at h7, Black will play there next turn, creating a mass of stable discs and winning easily. Thus, White must play h7, leaving the position in Diagram 8-26. Now Black passes and White must initiate play into the 4-square region in the upper right. The perfect play sequence is shown in Diagram 8-27, with Black getting the last move, keeping most of the right edge, and winning 36-28.
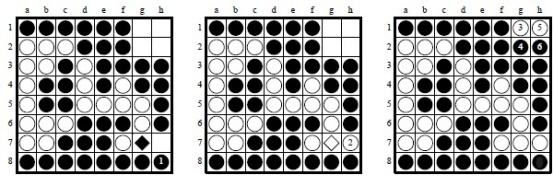
Diagram 8-25 Diagram 8-26 Diagram 8-27
White to move Black passes Black wins
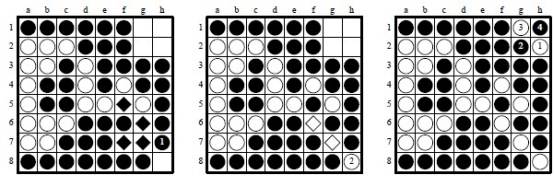
Diagram 8-28 Diagram 8-29 Diagram 8-30
White to move Black passes Perfect play
Feeding the opponent
Suppose that in Diagram 8-24, Black plays to h7 instead of h8, creating the position in Diagram 8-28. Basic even number theory tells us that White should move into the odd region by playing h8, as shown in Diagram 8-29. However, Black now passes, and White must play first into the 4-square region. Although White can capture the right edge, with perfect play Black holds on to win 33-31 (Diagram 8-30).
The only way for White to win in Diagram 8-28 is to create legal options for Black in the 4-square region, which will eventually allow White to get the last move in the region. This is called feeding the opponent. In this case, White should feed Black moves by beginning with g1 (see Diagram 8-31). No matter where Black plays on his next turn, White can now take full advantage of even number theory by playing to the odd region, i.e., h8 (see Diagrams 8-32 and 8-33). This leaves 2 empty squares in the upper-right, and since Black has access to one of the squares, White will get the last move in this region, winning the game 33-31.
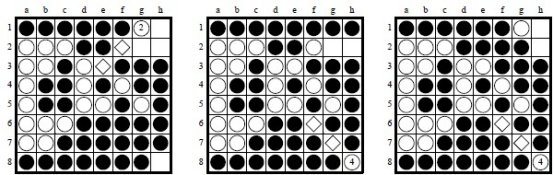
Diagram 8-31 Diagram 8-32 Diagram 8-33
Black to move After h1, h8 After g2, h8
